
How to Remove a Sink

A kitchen sink is, along with the toilet, probably the most used item in the household. Such frequent use can easily make them stained and worn out. When that occurs, replacing the sink with a new one may be the best way to improve the look and functionality of your kitchen. Removing and installing a sink is far from easy, but it’s possible to do it yourself. Follow our step-by-step instructions and learn how to do it.
Step 1 – Required materials and tools
First of all, you’ll need a new sink. Choose it carefully – it must fit the countertop hole perfectly (length, width and depth). Next, you will need some plumber’s putty, a material used as sealant in plumbing.
Before you start working on removing the old sink, make sure that you have all the tools you’ll need: adjustable or open-ended spanner, drill and bits, a scraper, nuts, screws, screwdrivers, wooden spacers (to support the sink) and a bucket or bowl to drain any trapped water into.

Step 2 – Disconnecting the garbage disposal
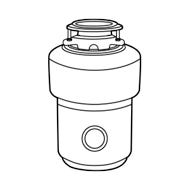
If you have a garbage disposal, unplug it as soon as you can. Disconnect the drain line by detaching the pipe from the disposal with a screwdriver. Also, turn off the circuit from your house’s fuse box (only the circuit connected with the disposal).
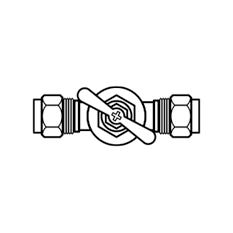
Step 3 – Disconnecting the water
The water supply must be turned off– you will find the valves below the sink. If there are no valves below the sink, trace the pipes as far as you can and you will probably find them. If not, shut off the water mains completely. Open the taps to drain the remaining water. Check if you’ve disconnected it properly.
Now, disconnect the flexible tubes that connect at the water turn-off valve and the sink (on the backside of the sink’s bottom). Loosen the metal nuts with a spanner. While you’re doing that, hold the tube with one hand so you can keep it upright and pour the water straight into a bucket when you unloose the nut. Also, disconnect the drain pipe that is connected to the sink strainer with a nut.
Step 4 – Removing the sink and cleaning
Now the sink has to be removed from the countertop. Unscrew all the sink clips, push the sink up to loosen it and pull it out from the countertop. Use a scraper to remove the leftovers of caulk and plumber’s putty on the countertop. Clean the surface before you start installing a new sink.

Step 5 – Installation and reconnection
If the new sink doesn’t come with screw-in clips that attach it to the countertop, install wooden spacers to hold it in place. They have to be screwed into the countertop’s inner sides. Apply some plumber’s putty to make sure that the seals are watertight.
Attach the new taps and waste disposal to the sink before you place them all together in the countertop. Reconnect everything the way it was (drain lines, garbage disposal, water lines), open the valves and test the new sink.

Validate your login